Netzero - EV Charger Settings
Introduction
Netzero automations enable configuration changes for Powerwall systems based on EV charging status. For example, you can configure your Powerwall to preserve charge when EV charging starts and avoid discharging the Powerwall into the (much larger) EV battery. You can also automatically start or stop EV charging, for example based on electricity pricing or Powerwall state of charge.
Depending on your EV charging setup, there are different ways for Netzero to determine charging status and manage charging. There are integrations for Tesla vehicles, Tesla Wall Connectors, a wide array of other EV chargers and EVs, and OCPP-compatible EV chargers.
To configure your EV charger, navigate to Settings > Tesla EV Charging (for Tesla EVs and chargers)
or Settings > EV Charging (for other EVs and chargers). Once the EV or charger is configured,
you can use the EV tab on top of the New Automation screen to configure automations based
on the start or stop of EV charging. You will alse see a new Control vehicle charging automation
action.
Tesla Vehicles
If you have a Tesla vehicle, you can configure access so Netzero can track its charging status and manage charging. Note: Netzero will only access charging information. It will not access location or any other vehicle data that’s not related to charging. The only location-related data it receives is whether the vehicle is at home, without the specifics of where home is (this is so automations can only trigger for home charging). Netzero does not have access to unlock or start your vehicle, or camera access. It will also not wake up your vehicle to get the charging status.
Charging status is tracked using Tesla Fleet Telemetry, a secure way for Tesla vehicles to report specific data to third-party services such as Netzero. The initial setup requires a few more steps:
-
If necessary, add permissions so Netzero can access vehicle data. Navigate to the
Settings > Tesla EV Vehiclescreen and follow the app instructions to enable the Vehicle Information and Vehicle Charging Management permissions. Once permissions are added, return to the app and refresh the state. If you had already added permissions when first logging in with Netzero, you will skip this step. -
Set up a Virtual Key for Netzero, a secure connection to your vehicle. The key can be revoked if required. Netzero does not have permission to unlock or start your vehicle. Note: if you are not the owner of the vehicle, you will need to be in the vehicle with a Tesla key card when completing this process. Older Tesla Model S and X vehicles do not support Fleet Telemetry.
-
Once the key is set up, Fleet Telemetry will be configured automatically, and the vehicle will start reporting its charging status.
Tesla Wall Connector
If you have a Gen 3 Tesla Wall Connector (Wi-Fi enabled Wall Connector), that’s another way for Netzero to determine charging status and manage charging.
If necessary, add the Wall Connector to your energy system in the Tesla app by selecting the product
drop-down in the top left and choosing Add Product. Once the Wall Connector is successfully added
to your energy system, the Tesla app should show a car garage with the Wall Connector next to the
Powerwall.
No further setup is required in Netzero to access Wall Connector data. You can confirm the status
on the Settings > Tesla EV Charging screen.
Notes
- If your Wall Connector is not added to your energy system, but listed as a separate product in the Tesla app (when using the top-left dropdown), you will have to contact Tesla Support to combine the two systems into one.
Pre-2021 Model S/X Tesla Vehicles
If you have a pre-2021 Tesla Model S or X, Fleet Telemetry is supported if your vehicle has an Intel Atom computer. See Fleet Telemetry for Pre-2021 Model S/X for details.
Other EV chargers or EV
See Energy Device Integration for documentation on configuring your non-Tesla EV charger or EV.
OCPP-compatible EV Chargers
Some EV chargers support OCPP (Open Charge Point Protocol), an application protocol for communication between EV chargers and central management systems (providers). If your EV charger is compatible, you can configure Netzero as the provider. This integration will share the EV charger’s status and allow remote control.
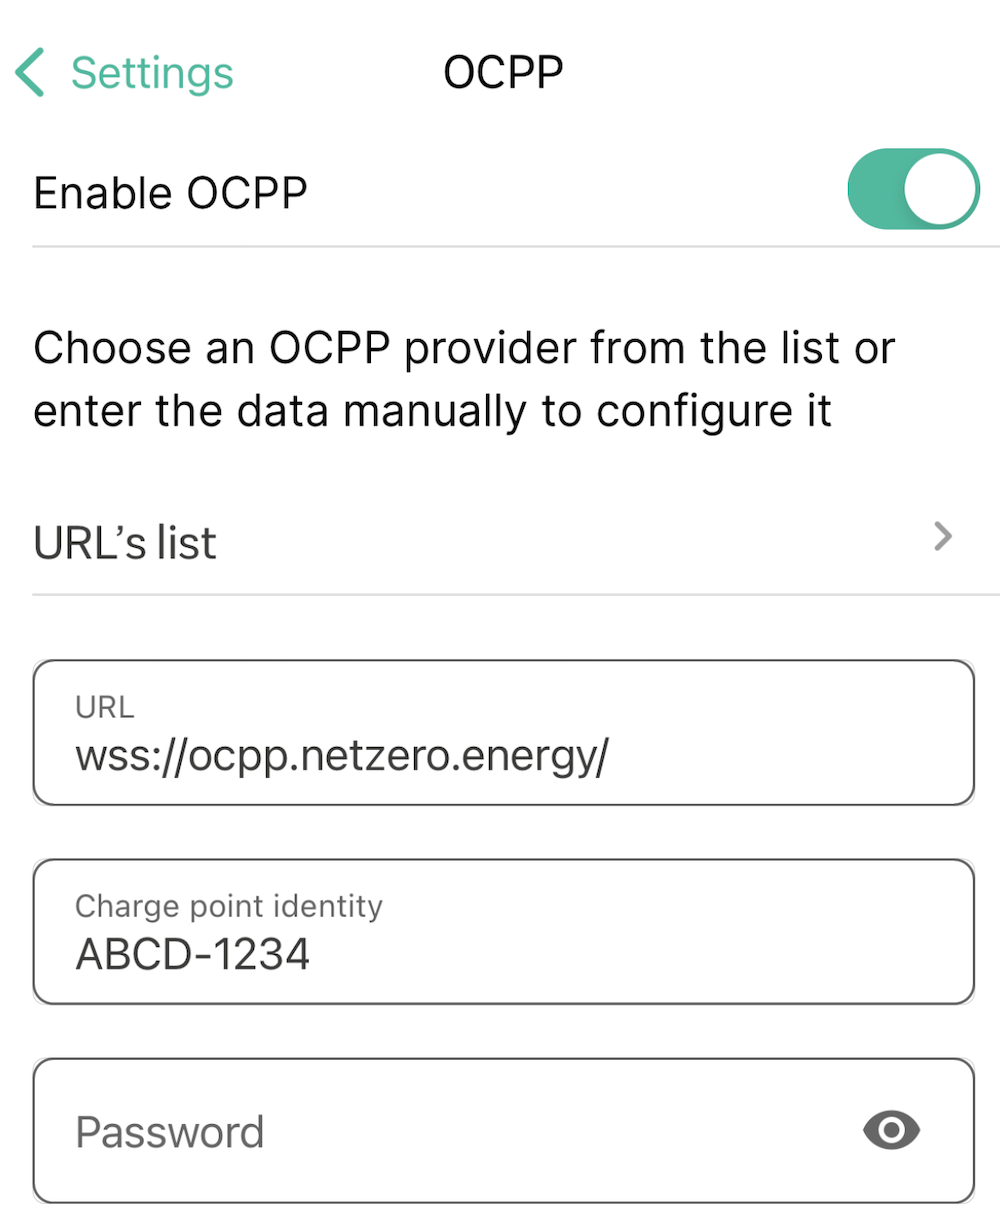
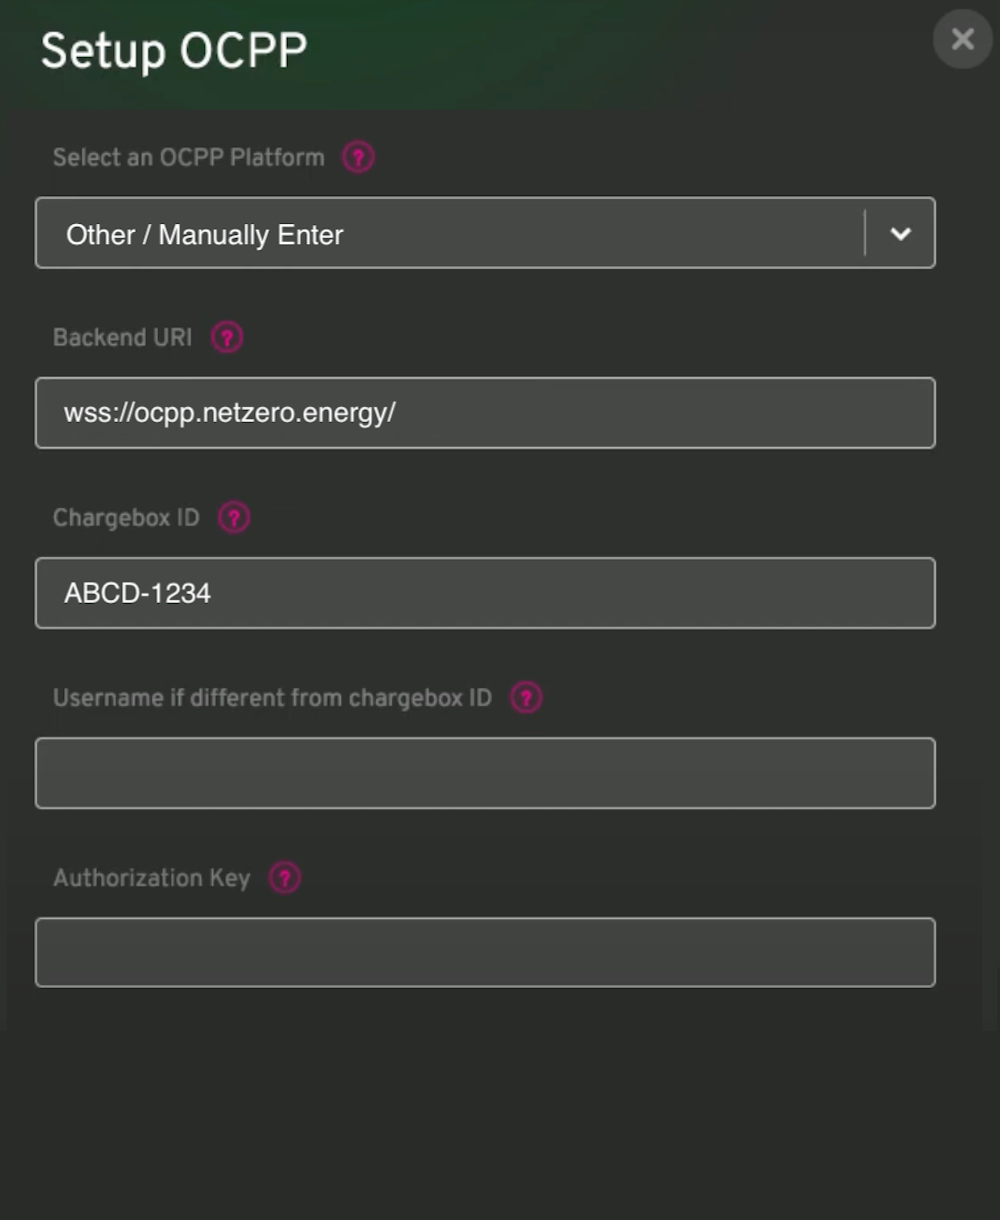
Examples of compatible chargers include Wallbox and myenergi zappi. If your EV charger is compatible, you will see an OCPP configuration option in the EV charger’s app. Configure it using the following settings:
Provider: wss://ocpp.netzero.energy/
Charge point ID: ABCD-1234 (replace with the "Charge point ID" shown in Netzero)
No password or username are required, so leave them blank.
Here are example configuration screens for Wallbox and myenergi zappi (replace the ABCD-1234 part with the “Charge point ID” shown in Netzero):
 |
 |
Notes
-
If your EV charger has only a provider address field and no Charge Point ID field (e.g. Fronius Wattpilot), append the ID to the end of the provider address, for example:
wss://ocpp.netzero.energy/ABCD-1234(replace with the “Charge point ID” shown in Netzero). -
Some EV chargers (e.g. Project EV, Autel) might not support the secure
wss:connection. If your EV charger is not connecting, try the alternate providerws://ocpp.netzero.energy/(note thews:instead ofwss:).